Pages

Wednesday, December 30, 2015

Railroad Grade

Mount Baker from the Railroad Grade
10.5 miles round trip, 3000 feet elevation gain
Difficulty: Moderate-Strenuous
Access: Gravel road easily handled by 2WD; Northwest Forest Pass required. Hiking season is July through September; bridge across creek is removed late in season

"Railroad Grade" doesn't sound like a promising hike name, but it actually refers to an absolutely fantastic hike up the moraine of the Easton Glacier to the high slopes of Washington State's Mt. Baker. This hike leads to up-close views of two massive glaciers and brings hikers up to the one of the climbers' camps for climbing Mt. Baker. On a clear day, there are views of peaks that are over a hundred miles away. Check trip reports from the Washington Trails Association for the latest conditions.

The hike is nearly three hours from Seattle, making it a bit of a long trip- however, the scenery along the hike more than justifies the effort needed to reach the trailhead. I hiked this trail with a friend at the University of Washington- we left Seattle fairly early in the morning, heading north on I-5 until we reached Burlington (over an hour) and then following Washington Highway 20 east through Sedro Woolley to Concrete; at Concrete, we turned left onto Burpee Hill Road and followed it until it joined Baker Lake Road; there we turned right and followed Baker Lake Road north, where we caught our only views of Mt. Shuksan that day. We turned left at the junction with NF-12, following the gravel road for a few minutes until we reached a junction with NF-13; here we took the right fork and followed NF-13 to its end at the Park Butte/Scott Paul Trailhead in the Mount Baker National Recreation Area.

We started down the the trail that left from the south side of the parking lot and headed towards Park Butte under clear September skies. The trail crossed a stream by bridge before crossing through a sparse forest in the flat bottom of the valley with minimal elevation gain. Occasional views of Mt. Baker popped out from the right side of the trail. As the trail approached a rocky crag on the western end of the valley, it turned north and began to gain elevation at a more noticeable and steady incline. Parts of this trail were very rocky and somewhat unpleasant; the rockiest section required crossing the creek that flowed down from the Easton Glacier. The creek was bridged at its most difficult crossings. Looking north from the bridge, we had our first clear view of Mt. Baker.

After crossing the creek, the trail reentered the forest and soon began a more aggressive climb, switchbacking its way up the western wall of the valley. After a substantial number of switchbacks and 2 miles of hiking, the trail came to a junction with the Scott Paul Trail. Here, you should avoid making the mistake my friend and I made of taking the right fork and heading onto the Scott Paul Trail; instead, you should stay left on the Park Butte Trail. The switchbacks ended after the junction; the trail straightened out and soon reached the junction with the Railroad Grade about 2.2 miles from the trailhead at the bottom of a large meadow.

My friend and I accidentally ended up on the Scott Paul Trail; not wanting to admit our mistake and backtrack, we decided to scramble up the lateral moraine of the Easton Glacier and bushwhack our way along the ridgeline back to the Railroad Grade trail. This was an extremely poor decision. Don't do it.

From the junction of the Park Butte Trail with the Railroad Grade Trail, take the right fork and head uphill into the wide meadows. For the next half mile or so, Mt. Baker fills the front of your vision as you ascend through the meadows and past perfect campsites to the base of the Railroad Grade, which is the long, narrow lateral moraine of the Easton Glacier.

The start of the Railroad Grade
This is the point where my friend and I reconnected with the main trail. We headed up onto the moraine and began one of the most unique sections of trail in the state. For the next two miles, we followed the narrow trail along the western wall of the Easton Glacier's former path, occasionally with steep dropoffs to both sides. Views expanded: to the south, more and more Cascade peaks began to poke above the horizon as we headed uphill. Most notable were the peaks of the Mountain Loop: White Chuck, Sloan, and Glacier Peak were just some of the horizon-piercing pinnacles and massifs. To the east, we caught some views of the North Cascades, including Snow King and Sauk.

Glacier, White Chuck, and Sloan from the Railroad Grade
Closer in, the views of the meadows around Mt. Baker National Recreation Area also improved. After a dry summer, the first signs of autumn were beginning to show: some of the berry bushes in the meadows had turned orange and red, even in just the second weekend of September. We could see the lookout atop Park Butte and found increasingly impressive views of the Twin Sisters and its glaciers as we ascended further.

Park Butte, Twin Sisters
The peaks of the Cascades from the Railroad Grade
The most impressive view was perhaps to our front, as we approached Mount Baker and the huge Easton Glacier. The mountain looks oddly smaller from close up than it does from farther away; both the summit and Sherman Peak seem a little dimunitive when viewed proximately. The immense size of the Easton Glacier, however, is best appreciated up close: once at the terminus, the true span of the glacier and the multitude of crevasses and seracs becomes visible. What is equally impressive is the size of the moraine-bound valley that we hiked along to reach the nose of the glacier: it is clear that the Easton Glacier has beat a tremendous retreat in the recent past, its terminus at least two miles further back than the maximum extent of its last advance.

Mt. Baker and the Easton Glacier
We passed a group of researchers along the way who were using Lidar to map the surface of the Easton Glacier. A little ways further, the ridge of the moraine flattened out into a rockier area and the trail headed into a small basin that held the climbers' camp for Mt. Baker. Quite a few tents were up in the climbers' camp; by scanning the higher reaches of the Easton Glacier, we could tell that many climbers were on the mountain at that time. The climbers' camp marks the end of the maintained trail up the Railroad Grade, but there's still much more to wander around and see for anyone who doesn't mind a little time spent off-trail.

We decided to get a closer view of the Easton Glacier and followed a footpath to the right of the camp that led past a small meltwater tarn to the edge of the moraine above the glacier. Being a little too adventurous and a dash reckless, we wanted to try to make it down to the side of the glacier. We picked a part of the moraine where the slope of the descent seemed fairly reasonable and began walking down. We soon realized that this was an extraordinarily bad idea- the moraine was less solid ground and more liquid ground. A few steps down on the moraine, a small portion of dirt beneath our feet suddenly collapsed and flowed downhill towards the glacier- a miniature mudslide. Afraid of setting off any more such slides, we retreated and had our on more solid ground overlooking the glacier and its magnificent crevasses.

Easton Glacier
After lunch, my friend and I contemplated further exploration of the Easton Glacier area but eventually decided to instead try to find and check out the Deming Glacier, which flowed to the west of the Easton Glacier. Looking at a map, it appeared that all we needed to do was cut roughly west from the climbers' camp to reach the Deming. On the ground, it was apparent that we'd have to ascend a little bit before we could actually begin making our way west.

From the climbers' camp, we followed a climbers' path up a tiny gully on the west (left) side of the basin. This trail climbed through loose rock for about two hundred feet of elevation gain before reaching a saddle of sorts to the left of the trail. We left the path here, heading into the saddle and soon passing by a pair of aqua-colored meltwater ponds.

Meltwater pond, Twin Sisters
Past the second pond, the trail arrived at another saddle, which provided the first view of the Deming Glacier. However, there was still a ways to go before reaching the rim of the valley carved by the Deming Glacier; so we continued onward. From the saddle, we picked our way downhill across the pathless piles of glacial rubble, then crossed an alluvium-filled former pond before heading uphill again slightly to arrive at a grassy patch along the rim of the canyon. Consult a map if you plan on making this off-trail excursion.

If the Easton Glacier was notable for its size, then the Deming Glacier was notable for its drama. Though smaller than the Easton Glacier, the Deming Glacier was perhaps even more spectacular. The glacier flowed down the southwest slope of the cone of Mount Baker before making a great bend at the foot of Colfax Peak, then plunge into a precipitous icefall before reaching the bottom of its great self-carved canyon. Waterfalls emanated from within the glacier, pouring glacial meltwater that had coursed through the Deming's moulins down volcanic cliffs many hundreds of feet tall.
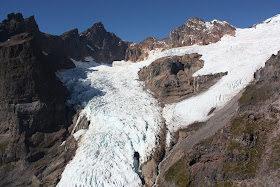
Deming Glacier flowing beneath the Black Buttes
My friend and I lounged on the rocks overlooking the great glacier, enjoying the September sun and the views that stretched as far as Mount Rainier and Vancouver Island. We had shared the Railroad Grade itself with plenty of other hikers, but a few hundred meters off the trail, we had the entire Deming Glacier to ourselves. It took some effort for us to finally pull ourselves away from the view and begin our return to the climbers' camp and then the trailhead.

This hike is highly recommended, whether you're a Washington state resident or just visiting: if you like glaciers, you can't not like the Railroad Grade. The Deming Glacier off-trail is only recommended for hikers who have prior experience with off-trail navigation; climbing up the moraine of the Easton Glacier is recommended for no one.

Deming Glacier terminus, Twin Sisters

Monday, December 28, 2015

Lassen Peak

Atop Lassen's plug dome, with Shasta in the background
5 miles round trip, 2000 feet elevation gain
Difficulty: Moderate, with short scramble at the end to reach summit; this hike begins at a high altitude and goes even higher.
Access: Paved road to a large trailhead parking lot. As of autumn 2015, Lassen Volcanic National Park entrance fee is $20.

Lassen Peak has the distinction of being the second tallest peak in northern California, the southernmost major Cascade volcano, and one of only two volcanoes in the contiguous United States to erupt in the twentieth century. Even though the summit tops out at 10,457 feet, the trail to the top is a fairly simple day hike that can be tackled by most reasonably fit people. The rewards are a close-up look at the summit crater of a plug dome volcano that last erupted less than a hundred years ago and sweeping views of the south Cascades, Central Valley, Coast Ranges, northern Sierra Nevada, and the Great Basin. The final scramble at the end is slightly more challenging, but even those who skip the scramble can still enjoy most of the fine views from the false summit. You'll want to bring sunscreen on this hike: most of the trail is quite exposed, with only minimal tree cover during the first part of the hike.

Lassen Volcanic National Park is a decently long way from anywhere, unless you live in or are visiting Red Bluff, California. It's a four-hour drive from the Bay Area to the trailhead when there's no traffic, with an endless stretch of passing by hazy cropland on I-5.

The trailhead is a vey sizable parking lot near the high point of the Park Road. The summit isn't visible from the trailhead, but it is possible to look up the barren, rocky slopes to see Vulcan's Eye, a prominent and instantly recognizable geological feature halfway up the mountain's south slope.

I hiked this trail with three friends after camping the night before at Manzanita Lake and spending the morning exploring Bumpass Hell. After lunching at Lake Helen, we made the short drive over the trailhead and started up the barren trail through a valley of loose dacite. Vulcan's Eye towered above us: it was as if the mountain itself was gazing upon the approaching hikers with suspicion. After reaching the foot of the main slope, the trail made a switchback, with a sign at the switchback discouraging hikers from cutting switchbacks and heading straight up the slope.

The long first switchback brought us onto the slopes of the mountain itself and we began an ascent towards the northeast. Here, a sign informed us that Vulcan's Eye is actually a former conduit for lava that has since solidified.

Lassen Peak, Vulcan's Eye
Though trees occasionally lined the trail, we were mostly out in the open on Lassen's south slopes, which provided us with excellent views to the south of nearby Reading Peak and faraway Lake Almanor. As we ascended, the heart shape of Lake Almanor became more and more apparent, while Reading Peak, which dominated the nearby landscape when viewed from the lower slopes, shrank to just another bump below the horizon.

Reading Peak and Lake Almanor
Meanwhile, the trail picked up its pace and began a moderately steep and steady ascent using a series of increasingly short switchbacks. Brokeoff Mountain and the other remnant peaks of the former Mount Tehama were soon visible in the west. As we climbed higher, we began to catch glimpses of the Central Valley, which was intially blocked by closer peaks.

Brokeoff Mountain
We made quick progress and soon found ourselves about halfway up at a sharp switchback with a view of the entire southeast face of Lassen Peak. From here, we could look up and see the trail switchbacking continuously up a ridge towards the summit. The trail here was remarkably well built, with stone walls and stone steps occasionally making travel a bit easier.

The ascent up Lassen
Further up the steady switchbacks, the number of trees along the trail dwindled. Those trees that could survive the exposure high on Lassen's slopes had been sculpted by the wind into grotesque krummholz, their branches twisting to find leeward shelter.

Krummholz
As the switchbacks continued, the views improved. The sapphire-blue waters of Lake Helen were soon fully visible, as were Juniper and Butte Lakes to the west. Pine forests stretched to the horizon to the south while the barren, arid mountains of the Great Basin came into distant view in the east.

Lake Helen
The trail often left us a little breathless, and not just from the wide views: the endless switchbacks had brought us to over 10,000 feet above sea level, where the air was substantially thinner. Each trailside placard indicated that we were a little closer to the summit, until we finally reached the summit ridge about an hour and a half after leaving the trailhead. The croplands of California's Central Valley was laid out beneath us and across the valley we could see the sharp peaks of the Trinity Alps. Views to the southwest were unfortunately limited by smog in the valley.

A short walk along the ridge brought us to the false summit, from which we could look straight down into the summit crater left from the eruptions of the early twentieth century. The crater looked less like traditional ideas of a steaming volcanic pit and instead looked more like a rubbish heap of dacite and ash. Four annotated placards detailed the views in all directions. Many hikers ended their hike here, but we decided to continue to the true summit, which rose less than a hundred feet more to the east of the false summit.

Final section of trail and scramble to the peak
We followed a path into the saddle between the peaks, passing the last patches of snow left over from snowstorms of years past (certainly not snow from the previous drought winter). The well-defined path petered out at the peak, so we scrambled in the general direction of the summit. Soon, we were atop the second highest peak in Northern California with hundred-mile views in nearly every direction.

Mt. Shasta, a great stratovolcano that is the second tallest of the Cascade volcanoes, rose to the north. Joaquin Miller once described Shasta as "lone as God, white as a winter moon," a description that was a little less apt during one of the driest seasons in California ever. Although some glaciers on its south slopes were still visible, the peak seemed largely denuded of ice.

The glaciated cone of Mt. Shasta in the distance
Scrambling to the east side of the peak, we found concrete blocks and a flat platform, remnants of a former weather station. From here, we surveyed the eastern part of Lassen Volcanic National Park. The most noticeable feature was the barren eastern slope of the mountain: this was the area devastated by the series of eruptions in the 1910s, including the most violent eruption in 1915, that helped to shape build the summit crater and the eastern slopes of Lassen Peak. This eruption was one of only two in the contiguous United States in the twentieth century, and was the first eruption in the US to be documented by photographs. These eruptions and the opportunities for scientific research that they provided were the impetus for transforming this otherwise quiet Northern California landscape into a national park.

Signs of volcanism weren't limited to Lassen itself: to the east were Prospect Mountain and Mt. Harkness, both gently-sloped shield volcanoes active in some geologically recent but anthropologically distant past. The Cinder Cone and the Fantastic Lava Beds were visible near the south end of Butte Lake. One wonders if the formation of Cinder Cone followed a simular script to that of Paricutin in Mexico: that of a crack in otherwise nondescript earth very suddenly bursting forth into a fountain of hot rock, catching unaware any farmers (or foraging wildlife) nearby.

In fact, there are few places like Lassen to see the different manifestations of volcanism. Lassen Peak is itself a dacite plug dome, with occasional explosive eruptions but formed primarily from the solidification of some fairly silicic and viscous lava that blocks an underlying source of extrusion. Brokeoff Mountain, to the southwest, is the remnants of the collapsed Mount Tehama, once a great stratovolcano composed of layered lava and ash flows; Mt. Shasta, visible far to the north, formed through a similar process, as did most of the other well-known Cascade volcanoes. Cinder Cone is, appropriately, a cinder cone: formed from explosive eruptions that deposit a hill of ash and volcanic rocks around the source of volcanism. Harkness and Prospect, both shield volcanoes, arose through eruptions of less viscous lava, which pooled out and created gentle slopes leading up to their summit craters.

Chaos Crags and the Devestated Area
Cinder Cone and the Fantastic Lava Beds
We spent a half hour at the summit before making our return. At the bottom of the summit block, a few hikers informed us that great views were to be had at the north end of the summit crater- where I'm sure Manzanita Lake would have been visible- but we decided to skip the view in order to make it back to the Bay Area in time that night.

Sunday, December 27, 2015

Sandstone Peak

View ftom Sandstone Peak towards Thousand Oaks and the Santa Ynez Mountains
6 miles loop, 1400 feet elevation gain
Difficulty: Easy-moderate; short rock scramble to reach summit of Sandstone Peak
Access: Paved (but narrow and windy) mountain road, free but limited trailhead parking

Sandstone Peak is the highest point in the Santa Monica Mountains. Perched high along the Malibu coastline, the summit offers one of the most sweeping panoramas in Southern California and is accessible an easy hike starting near the Circle X Ranch. This is a perfect hike for winter, when the high peaks of the San Gabriel are cold and snow-capped. This hike traverses some beautiful terrain in the Santa Monica National Recreation Area, visiting interesting rock formations and providing views of the ocean, the city, and the mountains. On the loop approach to Sandstone Peak, the hike isn't just about the destination: the journey provides consistent views, interesting rock formations, and comparatively lush vegetation for Southern California. It's a highly recommended trip for anyone interested in exploring the mountains around Los Angeles.

This hike is easily accessible from points in West Los Angeles, Oxnard-Ventura, or the San Fernando Valley. From downtown LA, take I-10 west to its terminus in Santa Monica and head north and west on the Pacific Coast Highway (California Highway 1) past Pacific Palisades and Malibu to Yerba Buena Road, which is around a half-hour out of Santa Monica. Turn right on Yerba Buena Road and drive just past Circle X Ranch to reach the trailhead for Sandstone Peak on the left side of the trail. It is also possible to reach the trailhead from the Valley or Ventura by taking US 101 to Ventura and then heading south on California Highway 23 to the Mulholland Highway, then taking the Mulholland Highway west for a short stretch and then turning right onto Yerba Buena Road and continuining on to the trailhead. Yerba Buena Road is exceptionally windy and pretty narrow no matter which approach is taken.

I hiked this trail on a sunny January day with my good friend in L.A. We started from the trailhead up the Sandstone Peak Trail, a wide former road with immediate good views towards the east of the Santa Monica Mountains. From the trailhead, we could already see the great cliffs of the Sandstone Peak massif that we would hike up to later in the day. After about 0.3 miles of ascent, the trail intersected with the Backbone Trail; we took the right fork towards the Mishe Mokwa Trail. After a short stretch along the Backbone Trail, we came to the fork with the Mishe Mokwa Trail, which we followed downhill to the left.

The Mishe Mokwa Trail began a gradual descent along the side of a lush canyon. We had great views from the trail of the canyon itself and of the San Fernando Valley and the San Gabriel Mountains in the distance.

Canyon on the Mishe Mokwa Trail
The greenery along the Mishe Mokwa Trail was remarkable, especially after two years of drought: with the exception of the nicely watered lawns in Beverly Hills, it had been a while since I had seen such a verdant shade in Southern California. Green grass and actual trees lined the trail.

Greenery along the trail
After leveling out from the gradual descent, the trail began to climb again. The canyon narrowed and the views of the San Gabriels gradually began to disappear behind the sandstone cliffs of the upper canyon. We passed by Balanced Rock, a large, pointed block of sandstone on a precarious cliff-top perch.

Balanced Rock
Past Balanced Rock, the trail stayed flat through Split Rock, a large boulder with a crack running down the middle that was about a mile and a half from the trailhead. Here, a spur trail branched off to the right that apparently led to a closer view of Balanced Rock; we decided to skip it, continuing on the Mishe Mokwa Trail. The next mile and a bit was a continued gradual ascent along the bottom of the upper canyon; however, taller vegetation and smaller rock features made this one of the less interesting sections of trail.

The Mishe Mokwa Trail met back up with the Backbone Trail about 3 miles into the hike. We turned left at the junction to take the Backbone Trail towards Sandstone Peak. The landscape around the junction was a drastic change from the Mishe Mokwa Trail: all of sudden, we were surrounded by a collection of oddly shaped sandstone cliffs and spires.

Rock formations along Sandstone Peak
The trail made its way gradually uphill through these formations, eventually coming to the first good ocean view of the hike. The many layered ridges of the Santa Monica Mountains dropped away to reveal the intense blue of the Pacific. Far to the south, we could see Santa Catalina Island draped across the ocean with its bipartite ranges lining the horizon. Santa Barbara Island appeared closer, but was miniscule by comparison. In the far distance we could make out the flatter outlines of San Nicolas and San Clemente Islands, the most remote of the Channel Islands.

Pacific Ocean and Catalina Island
Views also opened up to the north: we could see Thousand Oaks and both the Santa Susana and Santa Ynez Mountains.

A little over a mile after we left the Mishe Mokwa Trail for the Backbone Trail, we arrived at a junction with the spur leading to the summit of Sandstone Peak, at a large, flat clearing where the Backbone Trail makes a sharp turn to the left. We took the spur for a short distance to the base of the summit; the last 30 meters or so to the summit required a simple scramble up some rocks.

Summit scramble
The summit, perched at 3,114 feet above sea level, was a rather narrow spot: there's not much room at the top. The top of the mountain was marked by a large monument for a W. Herbert Allen, who was apparently closely involved in the Boy Scouts of the Los Angeles area. The plaque claims that the summit is called Mt. Allen, but that appears to be an unofficial designation.

The views were outstanding and nearly all-encompassing. To the west, Anacapa and Santa Cruz Islands rose above the Santa Barbara Channel and the Santa Ynez Mountains formed a long backbone above the Oxnard Plain and the Santa Barbara coastline. To the south was the ever-blue Pacific; to the east, that backyard of Malibu, the many low, rocky peaks of the Santa Monica Mountains; and to the north, the Santa Susana Mountains and the hills dividing Oxnard and Thousand Oaks from the San Fernando Valley. Far off, the high peaks of the San Gabriel and the snowy summit of Mt. Baldy rose above the LA sprawl.

Anacapa and Santa Cruz from the summit
After a short time at the summit, we returned to the Backbone Trail and finished the last section of the loop, a somewhat steeper 1.5-mile descent to the trailhead. Along the way, we had glorious views of golden hour lighting on snowy Mt. Baldy.

Snowy Baldy from the descent
The Backbone Trail reconnected with the trail returning to the Sandstone Peak trailhead about a mile after leaving the summit, at the first junction after the summit junction. We turned right at this fork and followed our initial trail downhill back to the parking lot, catching a beautiful sunset over the Pacific just before we returned to our car.

Evening light on the Santa Monicas

Monday, December 21, 2015

Qixingshan (七星山)

Fumaroles on the northwest side of Qixing Mountain
5 kilometers shuttle, 800 meters elevation gain
Difficulty: Moderate
Access: Regular bus service to both the start and endpoints to this hike.

Qixingshan, or Seven Star Mountain, is the tallest mountain in Yangmingshan National Park, which protects a cluster of mountains in the northern part of the Taipei metropolitan area. Qixingshan is a notable hike not just for the wide views you'd expect at a local highpoint, but also for the collection of smelly fumaroles that crowd its north and west slopes, evidence of former volcanism in the area. The hike visits some very beautiful country of wide open meadows, steep-sloped mountains, and sulfur-stained steam pits; it's hard to imagine when hiking through the area that the mountain still lies within the city limits of the largest city in one of the most densely populated states on earth.

This hike description details a route from the Yangmingshan National Park Visitor Center up to the summit of Qixingshan and then downhill to the massive fumaroles at Xiaoyoukeng. Taipei's excellent system of public buses makes it possible to access both trailheads by public buses (during reasonable daytime hours). To reach the trailhead at Yangmingshan National Park visitor center, I took the 260 bus up from Taipei Main Station; it's a little less than an hour bus ride and is probably slower than taking a bus up from Shilin or Jiantan, but it's also a simpler route to the start. While on the bus, UVA alums should keep their eyes out for a familiar looking structure on the left when the bus passes Tatung University- the school's Shan-Chih Hall is a replica of a famed Thomas Jefferson design.

I hopped off the bus at its terminal stop, which is in the village of Yangmingshan. The true trailhead for this hike is the Yangmingshan Visitor Center, which was another couple hundred meters further uphill along the road, so I began to follow the main park road (Yangjin Road) uphill from the bus station. Along the way I noticed a trail that allowed me to reach the visitor center without walking along a high traffic mountain road, so I hopped on the trail instead and soon emerged by the visitor center. The plaza area around the visitor center offered some decent views of the summits of Qixingshan, my destination for the day.

View of Qixingshan from the visitor center
From the visitor center, I followed a side road that paralleled the main road for a hundred meters to a junction; from here, I headed back towards the direction of the main road and came to the start of the trail, which ran parallel to the road to the east. I followed the trail on a very gradual uphill, soon coming to a trail junction. The path straight continued to the follow the road; the path to the right headed in the direction of Qixingshan. I took the path to the right, the Qixingshan Trail (七星山步道), which quickly became a well-maintained stone staircase heading straight up the mountain through a dense forest.

A short way into the ascent, I noticed a particularly beautiful bird on the right of the trail with long, blue tail feathers. I also noticed an abundance of squirrels, many of which seemed habituated to humans: they aggressively approached me as I hiked by. A couple who were hiking by decided to entice the squirrels closer, which was a poor idea: when the man held out his hand to one of the squirrels, the squirrel took a bite, leaving an unfortunate bleeding gash in one of the man's fingers. Don't approach the squirrels.

Interesting bird along the trail
About a kilometer and a half and many flights of stairs in, I came to a junction with a trail to the left that led directly towards the summit of Qixingshan. I chose to instead take a longer route towards the summit and followed the trail leading straight forward towards Qixing Park. This route was relatively flat for the next 300 meters and soon emerged from the forest onto the flat, grassy landscape of Qixing Park.

View of the east summit from Qixing Park
Qixing Park is a rather odd spot- it's a wide, flat shoulder on the fairly steep sides of Qixingshan and it has been manicured into a fairly non-natural landscape with stone tables and pavilions scattered throughout. The park provides some of the first views from the hike down into the Taipei basin. Unfortunately, it was quite smoggy in the basin on the day of my hike, so it was difficult to discern much. Smog is a problem on many days in Taipei, so clear blue skies are a rarity rather than the norm.

The trail breaks into multiple paths when it enters Qixing Park. It is fine to take any of the branching paths, as they all meet back up at the far end of the park. After exiting the grassy, manicured part of the park, the trail stayed relatively flat for the next hundred meters or so before reaching a junction with the trail up to the Qixingshan East Peak, which broke off to the left.

I started up the left fork at the junction and began ascending a staircase leading directly towards the east summit. The landscape here was much different from the forested trail earlier; the entire east side of the mountain was covered with tall grasses, part of the reason why the Yangmingshan area was originally called Caoshan, or Grass Mountain, before it was renamed after a Ming Dynasty scholar by Chiang Kai-shek during his rule of Taiwan.  Large volcanic rocks occasionally littered the landscape. Views improved dramatically with every step further up the mountain, with the meadows of Qingtiangang and the other volcanic peaks of the Datun Mountains rising to the east. The trail tackled the slope quite directly, with stairs and no switchbacks, allowing for a rapid ascent of a mountainside that was at times very steep.

The meadows of Qingtiangang
Less than half a kilometer and many hundreds of stair steps from the trail junction near Qixing Park, the I reached the east peak of Qixingshan. This peak was a mere ten meters shorter than the true summit, which was visible across a small saddle. The view was quite wide: the Qingtiangang meadows visible during the staircase ascent were still in view, while the view to the north widened, encompassing the northern end of the Datun Mountains and of Jinshan, a town on the Pacific coast.

The summit of Qixingshan viewed from the east summit
I descended from the east summit into the saddle between the summits, passing by a trail junction leading downhill to the left. The grass in the saddle area was actually surprisingly tall and reached over my head. From the saddle, I made a last short push and arrived at the main summit of Qixingshan, the highest point in the Datun Mountains and Yangmingshan National Park.

The view was simultaneously incredible and underwhelming. The less hazy skies to the north, east, and west provided sweeping vistas of the park ands its steep, forested mountains. Looking to the south, on the other hand, was not much different from looking into a smoke-filled room. Taipei 101 barely broke through the thick particulate blanket; otherwise, only the most visually prominent landmarks and features, such as the Danshui and Keelung Rivers, could be discerned through the smog. The summit area is an extremely popular spot, so it's unfortunately been paved over, with a wooden pole proclaiming the name and height of the summit rising at the center of the paved platform.

View of Datun Mountain from Qixingshan
View north from Qixing Mountain
After enjoying the view and my lunch of scallion-stuffed shaobing (pastries), I began my descent down the trail towards Xiaoyoukeng, which started from the west end of the summit platform. This trail was entirely one of stone stairs, as well. The first part of the descent featured good views through the grass back up to the summit, as well as of Datun Mountain to the west. Interpretive signs along the way pointed out the view of the Danshui River and Guanyin Mountain, although Guanyin Mountain was more or less invisible in the smog.

Then came the smell of rotten eggs and the sight of steam rising from the mountainside. A fumarole! A barren patch of yellow rock near the trail supplied both the smell and the steam. Qixingshan and the rest of the Yangmingshan are are in fact the remnants of a volcano; the fumarole was just a reminder of the area's geological past. Enough magma or hot rock must remain under the Yangmingshan area that groundwater can get superheated and returned to the surface as steam.

As I hiked onwards, fumaroles became increasingly frequent along the trail. At times, steam completely engulfed the trail. Breathing in large amounts of foul-smelling sulfur-laden air was unavoidable. An interpretive sign near the trail informed me that I was breathing in a good number of poisonous compounds and encouraged me to minimize my time among the fumes.

The fumarole activity peaked when the trail began descending into a steep valley littered with smokes. I've heard that Alaska has a place named the Valley of Ten Thousand Smokes; by merit, this valley has equal claim on that name. Small pockets of steam popped up from every side of the valley. At the end of the valley rose the largest fumarole of them all: Xiaoyoukeng (literally, little oil pot).

Fumaroles on the descent to Xiaoyoukeng
I descended through the spectacularly smelly valley to the rim of the Xiaoyoukeng pit. Presumably, there would be a good view down to the smoking fumarole when the winds are favorable; when I walked past this section, the wind was blowing the steam right back towards the mountain, meaning that the view down was simply one of steam and that the smell was exceptionally strong along this section of trail. I hurried through and descended down the last few staircases to the tourist viewing platforms and the end of the hike.

Xiaoyoukeng fumaroles
Xiaoyoukeng is by far the most spectacular sight of Yangmingshan National Park. Here, the west flank of Qixingshan has partially collapsed, exposing a massive fumarole that churns out a great spout of steam from an ultraheated sulfuric vent. This fumarole likely played a role in the establishment of the area as Daiton National Park during the Japanese occupation era, the first national park on the island. The fumarole is a reminder that the volcano underlying Qixingshan is merely dormant, not extinct.

I hopped on the 108 bus from the Xiaoyoukeng parking lot to return to the Yangmingshan bus station near the visitor center; from there, I hopped on the first bus heading back to Taipei, which took me down to the Shilin MRT station.

Wednesday, December 9, 2015

Blanca Lake

Blanca Lake
7.5 miles round trip, 3300 feet elevation gain
Difficulty: Moderate; few trail obstacles but lots of elevation gain
Access: Decent but long unpaved road to trailhead, Northwest Forest Pass required ($5 daily/$30 annual)

The turquoise waters of Blanca Lake are nestled in a cirque beneath the high peaks of Washington's Monte Cristo Range and are one of the most brilliant sights in the North Cascades. The uphill hike to the lake is consistently steep and perhaps a little tedious, but the view of the lake glimmering below snowcapped peaks is certainly worth it. The hike is in the Henry Jackson Wilderness in Mount Baker-Snoqualmie National Forest, about a two hour drive out of Seattle; the hike itself is feasible for anyone in decent shape during the summer, with few obstacles save the long 3000-foot uphill climb that forms the bulk of the hike. In the winter, snow adds a magical touch to the trees and peaks but can make route-finding and travel much more difficult.

A friend and I hiked to Blanca Lake on a crisp December day, heading out of Seattle early in the morning to take as full advantage as we could of the brief sunlight hours of the Northwest winter. We took Route 522 (Lake City Way) northeast from Seattle, merged onto US Route 2 at Monroe and followed Route 2 east under the shadow of the dramatic facades of Mt. Index and Baring Peak. We turned left onto Beckler Road just after passing Skykomish, continuing on the road as it turned from pavement to gravel and into NF-65. After crossing a low pass, NF-65 brought us downhill to a junction with NF-63; we turned right at this junction and soon arrived at the Blanca Lake trailhead on our left, about 2 hours out of Seattle.

The trail gets straight to the point, almost immediately beginning the uphill switchback climb after leaving the trailhead and entering the forest. The next two miles involved an uphill ascent with over thirty switchbacks. We initially ascended through a forest filled with sizable Douglas firs. As we worked our way up the switchbacks, the vegetation became less impressive, with less massive trees. A little over halfway up the switchbacks, we encountered the first traces of snow; after ascending a few more switchbacks, snow began to cover the trail entirely, so we put on microspikes to ease the remainder of the ascent.

Ascent through the forest
Trail through the snow
After over thirty switchbacks, the trail began to follow the top and then the side of the ridge, providing brief views of Mt. Daniel and Chimney Rock through the trees on one side and more open views of Kyes Peak and Glacier Peak on the other. Snow levels were unseasonably low for December during our hike, but there was still well over a foot of snow on this section of trail.

Glacier Peak
The snow got progressively deeper as the trail reached the crest of the ridge, with up to two feet of snow at a ridge-top meadow with views of Kyes Peak and Monte Cristo. The snow was heavy and thick enough to weigh down the branches of the small conifers nearby. We could tell that the wind was strong higher up on the mountains: a streak of windblow snow extended from the summit of Kyes Peak.

Atop the ridge
A short descent from the meadow brought us to Virgin Lake, which was entirely frozen over. The ice on the lake was thick enough that we were able to briefly stroll on the lake before continuing onward.

Virgin Lake, frozen
Past Virgin Lake, the trail began a gradual descent on the west side of the ridge, with occasional views of a deep valley to the west. After the trail finally flattened out, Blanca Lake came into view. Our first view was from a gully above the lake, from which we could see across the lake to both Columbia and Kyes Peak. The lake was thankfully still unfrozen, so we could still see the intense turquoise water color. The Columbia Glacier (no relation to the similarly named tidewater glacier in Alaska) lay across the lake, in a basin between Columbia and Monte Cristo Peaks.

Blanca Lake
We descended the final section of trail to the lakeside, passing a few blowdowns before we could stand at the edge of the slightly-misnamed lake. The lake's unique color is the result of glacial flour, an extremely fine silt produced by glacial erosion. Glacial meltwater carries the flour from the Columbia Glacier down to the lake. This flour absorbs short wavelength light, leading to greener (and less blue) waters when glacial flour is abundant.

After admiring the lake and its beautiful backdrop, we began to make our way back, returning to the trailhead just before the early sunset characteristic of Northwest winter days. Although we were able to hike this trail in December, I strongly encourage you only to visit Blanca Lake during the summer months (July to October) unless you are aware of the snow conditions near the lake and have the proper equipment and experience to do the hike in the winter months.